How to remove layer lines 3d printing?
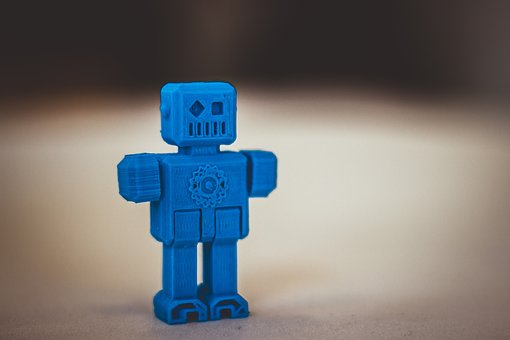
Have you ever printed a 3D object only to notice undesirable lines on the surface after it’s done printing? These lines, known as layer lines, can be frustrating to deal with and can make the final product look unprofessional.
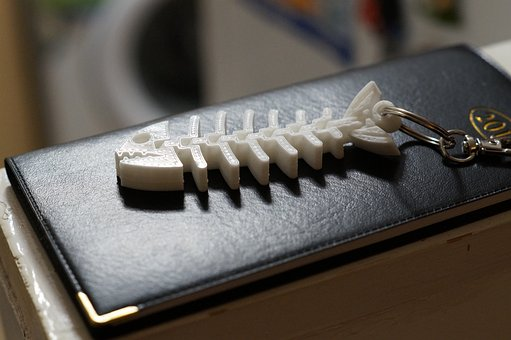
3D printing has become increasingly popular in recent years, thanks to its ability to create custom and intricate objects. However, many 3D printing enthusiasts struggle with removing layer lines, which can occur due to a variety of reasons, such as printer settings or the type of filament used.
Removing layer lines is crucial for achieving a clean and professional-looking 3D print. It may seem like a daunting task, but there are various methods and techniques that can help you get rid of them. In this article, we’ll explore seven effective ways to remove layer lines from your 3D prints, so you can achieve the quality of print you desire.
Causes of Layer Lines
Layer lines are caused by a number of factors during the 3D printing process. One of the most common causes is when the nozzle, or extruder, moves too quickly across the build plate. This can result in layers that aren’t properly fused together, leading to gaps and ridges that form layer lines.
Another cause can be due to insufficient cooling of the filament, which can lead to warping or buckling of the plastic as it’s being printed. Lastly, layer height settings that are either too high or too low can also contribute to layer lines. If a layer is printed too thin, it won’t be able to fill in all the details and gaps; conversely, if a layer is printed too thickly it may cause a rough surface finish with visible layering lines.
How To Remove Layer Lines
Fortunately, there are several ways you can minimize and remove layer lines from your 3D prints. The first step is to ensure that your printer is properly calibrated and maintaining consistent speed and temperature settings during printing. Additionally, adjusting your printer’s software settings such as infill density and layer height can help reduce visible layering lines on your objects’ surfaces.
You may also want to consider using post-processing techniques such as sanding down any rough edges or applying a coat of primer before painting for a smoother finish.
Poor Quality 3D Printer
Poor quality 3D printers can lead to a range of issues and ultimately affect the quality of your prints. Poor quality printers may be unable to maintain consistent speed and temperature settings while printing, resulting in poor layer adhesion or warping due to insufficient cooling. Additionally, if the printer is not properly calibrated it can cause gaps and ridges in the layers which will form visible layer lines on your prints surface.
Poor quality 3D printers may also have inaccurate nozzle settings which can cause over-extrusion or under-extrusion, leading to uneven surfaces or inconsistent details in your prints. In order to ensure high-quality prints, it is important to invest in a good 3D printer that is properly maintained and calibrated.
Improperly Set Nozzle Diameter and Temperature Settings
Improperly set nozzle diameter and temperature settings can have a huge impact on the quality of your 3D prints. If the nozzle diameter is too small, it will cause under-extrusion which will result in gaps in between layers and create visible layer lines on your prints. Additionally, if the nozzle diameter is too large it can cause over-extrusion leading to uneven surfaces and inconsistent details in your prints.
Temperature plays a key role in 3D printing as well; if the temperature is too low during extrusion it can lead to poor adhesion between layers, while if the temperature is too high it can cause warping due to insufficient cooling. It’s important to ensure that both the nozzle diameter and temperature settings are properly calibrated and maintained in order to get high-quality prints without any visible layer lines.
Low Quality Filament Material Used in the Prints
Using low quality filament material in 3D printing can result in prints with visible layer lines. Low quality filament materials are usually made from recycled plastic and contain impurities that can cause poor adhesion between layers, resulting in gaps and noticeable layer lines.
Additionally, these materials often have inconsistent diameters which can lead to under-extrusion or over-extrusion, further contributing to the formation of layer lines. To avoid this issue it’s important to use high quality filaments that are specifically designed for 3D printing and have consistent diameter throughout the roll. These filaments will provide better adhesion between layers and create smooth surfaces without any visible layer lines.
Incorrect Layer Heights Used in the Prints
Incorrect layer heights can be a major contributor to layer lines in 3D prints. Layer height is the vertical distance between each layer of filament that is deposited during the printing process. If the layer height is too low, this can cause an excessive amount of layers being printed, resulting in noticeable ridges and bumps on the surface of the object.
On the other hand, if the layer height is too high then there will be gaps between layers and visible lines where they overlap. To optimize your 3D prints it’s important to find a layer height that works for your specific material and printer settings.
Generally speaking a 0.2mm or 0.3mm layer height should provide good results with most materials, but it may not be optimal for all types of objects or materials. Experimentation with different settings is key to finding the right one for you!
Poorly Tuned Calibration of the Printer’s Extruder Head
Poorly tuned calibration of the printer’s extruder head can be another major cause of layer lines in 3D prints. If the extruder is not calibrated correctly, it may fail to deposit filament properly during printing which ultimately results in visible lines or ridges on the printed object. To ensure your 3D prints come out as smooth and accurate as possible, it’s important to fine-tune your extruder settings.
This usually involves adjusting the nozzle temperature and retraction settings so that your filament flows evenly without any gaps. It’s also important to make sure that the distance between your nozzle and build plate is correct, as this will affect how well filament sticks to the bed and how evenly it deposits when printing. With a bit of trial and error you should be able to find optimal settings for your printer!
How to Minimize Layer Lines During Printing
Minimizing layer lines in 3D printing can be achieved by tweaking the printer settings to ensure consistent and accurate filament deposition. It’s important to adjust the nozzle temperature and retraction settings, as well as make sure that the distance between your nozzle and build plate is correct. Additionally, using a fan to keep the printed object cool while printing can help reduce layer lines. This prevents warping and keeps layers from shrinking or expanding at different rates due to heat.
Furthermore, it’s important to use the right type of filament for your print job – certain materials such as ABS or nylon may require higher temperatures than PLA or PETG, which could result in layer lines if not set correctly. Finally, slowing down your print speed can also help reduce visible layer lines on your prints. With these tips you should be able to achieve smooth and accurate 3D prints every time!
Increase Layer Height Thresholds and Choose High-quality Materials
Increasing the layer height thresholds and choosing high-quality materials are key steps to minimizing layer lines in 3D printing. Layer height thresholds refer to the distance between each printed layer, which can be adjusted to reduce visible lines on your prints. Increasing this threshold reduces the amount of filament needed per layer, which can help minimize warping and heat build-up during printing.

Additionally, using higher quality materials such as PLA or PETG can also help reduce visible layer lines as these filaments require lower temperatures for proper deposition. It’s important to use the right type of material for your print job – certain materials may require higher temperatures than others, which could result in layers being deposited unevenly if not set correctly. Finally, make sure to slow down your print speed as higher speeds can cause filament extrusion issues that lead to layers not bonding properly or forming visible lines on the finished product.