How does a 3d printer work step by step?
Have you ever wondered how a 3D printer works? It’s fascinating to think about the process that goes into turning a digital design into a physical object.

3D printing technology has been growing in popularity over the years, with more and more people using it for various purposes. It’s not just limited to industrial manufacturing – 3D printers have found their way into homes, schools, and even medical labs. However, many people still do not understand how 3D printing actually works.
In this article, we will take a step-by-step look at how a 3D printer works. Whether you are new to 3D printing or just curious about the process, you’ll come away with a deeper understanding of how this innovative technology works.
The 3D Printing Process Step by Step
3D printing is a form of additive manufacturing technology that creates 3D objects from digital models. It works by following a step-by-step process to build the desired object layer by layer. Here’s how it works:
1. Designing: The first step is to create a 3D model using CAD software or 3D scanning technology. The software allows you to customize and adjust the design to your exact specifications.
2. Slicing: Once the design is finalized, it needs to be sliced into many thin layers which will be used as instructions for the printer. This is done using slicing software such as Cura or Slic3r.
3. Printing: The next step is to print the object layer by layer according to the instructions generated from the slicing software. Depending on which type of printer is used, this can involve depositing melted plastic, sintering powder particles, jetting photopolymer resin, or any other technique used by specific printers.
4. Finishing: After printing, most objects need some post-processing in order to achieve a smooth finish and remove any imperfections such as excess material or stringing between layers. This can include sanding, smoothing with chemicals, painting or applying coatings for additional strength and protection against environmental factors such as UV light or moisture.
By following these steps in sequence, users can create virtually any 3D object they desire with great precision and detail using 3D printing technology!
Designing the Object in CAD Software
Designing an object in CAD software is the first step of the 3D printing process. This allows users to customize and adjust the design to their exact specifications. CAD stands for Computer-Aided Design and it’s a type of software that helps with designing, analyzing and manufacturing products. It enables designers to create 3D models of objects which can then be used as instructions for the printer.
To get started, users need to open up their chosen CAD software program and create a new project. They can then start drawing out the desired shape of their object using basic tools such as lines, arcs and circles. The user can also add more advanced features like curves, fillets and chamfers for a more complex look. Once the basic shape is drawn out, they can begin adding details such as holes, slots or threads until they are satisfied with the design.
Once complete, designers can save the file so that it’s ready for slicing in the next step. With modern CAD software programs, users have access to a wide range of powerful tools that allow them to create highly detailed designs with great precision – enabling them to bring even their most ambitious projects to life!
Slicing the Model into Layers
Slicing the Model into Layers is the second step in the 3D printing process. This involves using slicing software to break down the 3D model into hundreds of horizontal layers. The slices are then sent to a printer, which reads them and prints each layer one at a time.
The slicing software works by taking the CAD model as an input and converting it into instructions that the 3D printer can understand. It essentially “slices” the file into thin layers, so that each layer can be printed separately. These sliced layers are usually 0.2-0.3mm thick and can be adjusted depending on the complexity of the design.
Once all of the layers have been sliced, they are ready to be sent to a printer for printing. Slicing software is essential for ensuring accurate results and helps make sure that objects are created precisely according to specifications. It is also possible to adjust layer height and other settings depending on material type or object size – helping users get great results every time!
Loading the Digital File into Printer Software
Loading the Digital File into Printer Software is the third step in the 3D printing process. This involves using printer software to upload the 3D model onto a computer or device connected to the 3D printer. The software essentially acts as an interface between the 3D model and the printer, allowing users to preview their design before it is sent for printing.
The first step when using printer software is to select a file format (such as STL, OBJ or AMF) that can be read by your 3D printer. Once you have selected this file format, you will be able to upload your model onto the software so that it can be printed.
The next step is to choose a build plate size, which sets up how much of your object will actually fit on the print bed of your 3D printer. You can also adjust other settings such as layer height and shell thickness, depending on how detailed you want your final product to be. Finally, you can preview a rendering of your model so that you can make any necessary adjustments before sending it for printing.
After all of these settings have been adjusted and configured, you are ready to send your digital file for printing!
Selecting and Prepping Raw Materials for 3D Printing
Selecting and prepping raw materials for 3D printing is an essential step in the 3D printing process. This involves choosing the right materials for your project as well as preparing them so that they can be used with a 3D printer.
When selecting materials, it’s important to consider factors such as compatibility with your printer, desired strength, durability and cost. Commonly used materials include thermoplastics like ABS and PLA, metals like stainless steel and titanium, composites like carbon fiber, wood filaments and resins. Depending on your project, you may need to use more than one type of material.
Once you have chosen the right material(s) for your project, you will need to prepare them for printing. This includes cleaning any dust or debris from the filament spools before loading them into your printer. You may also need to adjust settings such as nozzle temperatures or print speeds depending on the material being used. Finally, it’s important to make sure that all parts of your printer are properly aligned so that prints come out correctly.
By taking the time to select and prep raw materials correctly before printing, you can ensure that your 3D prints come out looking great!
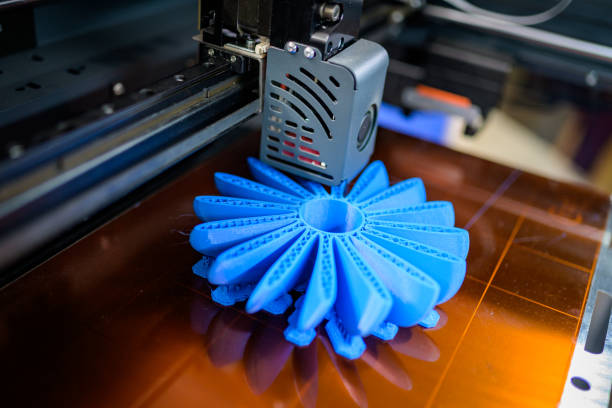
Building the Object Layer by Layer (Additive Manufacturing)
Additive manufacturing, or 3D printing, is a process in which an object is built layer by layer from the bottom up. The process starts with a 3D model of the desired object, which is then sent to the printer for it to create the physical version.
The printer begins by depositing a thin layer of material onto a base platform. It then moves across this layer and deposits another thin layer of material on top, forming a single solid piece. This process continues until the entire object has been created.
Each individual layer that is deposited contains parts of the design that are not visible in other layers, allowing complex objects to be created with intricate details. With each additional layer, the object takes shape and slowly builds itself into its final form.
Additive manufacturing can be used to create almost anything from functional prototypes to consumer products such as toys or jewelry. It is becoming increasingly popular due to its flexibility and cost efficiency compared to traditional manufacturing methods.
Fused Deposition Modeling (FDM) Process
Fused deposition modeling (FDM) is a 3D printing technology that creates objects layer by layer, similar to other forms of additive manufacturing. The printer uses a thermoplastic filament which is heated and deposited through an extrusion nozzle onto the build platform. This process results in a three-dimensional object with layers of plastic material formed into the desired shape.
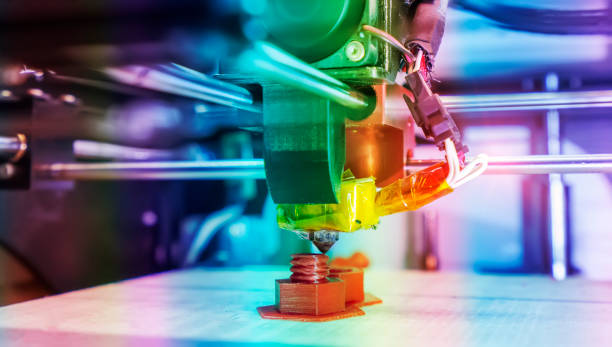
FDM is used for prototyping and producing functional parts such as fixtures, tools, jigs and low-volume production runs. It can also be used to produce end-use products such as toys and automotive components.
The FDM process has several advantages over traditional subtractive manufacturing techniques such as milling or drilling. It enables quick turnaround times for prototypes and has low setup costs due to its simplicity. It also enables intricate designs to be produced with ease due to its ability to produce complex geometries that would otherwise be difficult or impossible using traditional methods. Additionally, FDM offers good mechanical properties and strength when compared to other 3D printing technologies.