3d printing skirt vs brim
Are you new to 3D printing and unsure about the difference between a skirt and a brim? Do you want to know which one is better for your printing project?
3D printing is a fascinating technology that has revolutionized the manufacturing industry. It allows you to create three-dimensional objects from a digital file. However, to get the best results, it’s essential to understand the different settings and options available in your 3D printer. One of the most important decisions you’ll need to make is whether to use a skirt or a brim.
Both a skirt and a brim are essential features in 3D printing. They help to improve adhesion and prevent warping, which can ruin your print. However, they work differently, and choosing the wrong one could affect the quality of your final product. In this article, we’ll explore the differences between a skirt and a brim and help you decide which one to use for your next 3D printing project.
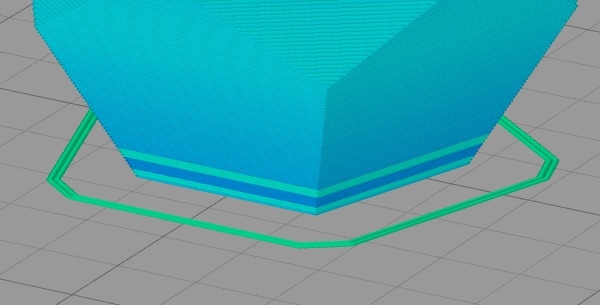
Skirt
A skirt is a thin line or loop of plastic that is printed around the base of an object. It helps to create adhesion between the print bed and the object, ensuring that it stays in place during printing. A skirt also serves as an anchor point for your filament, preventing it from buckling during printing.
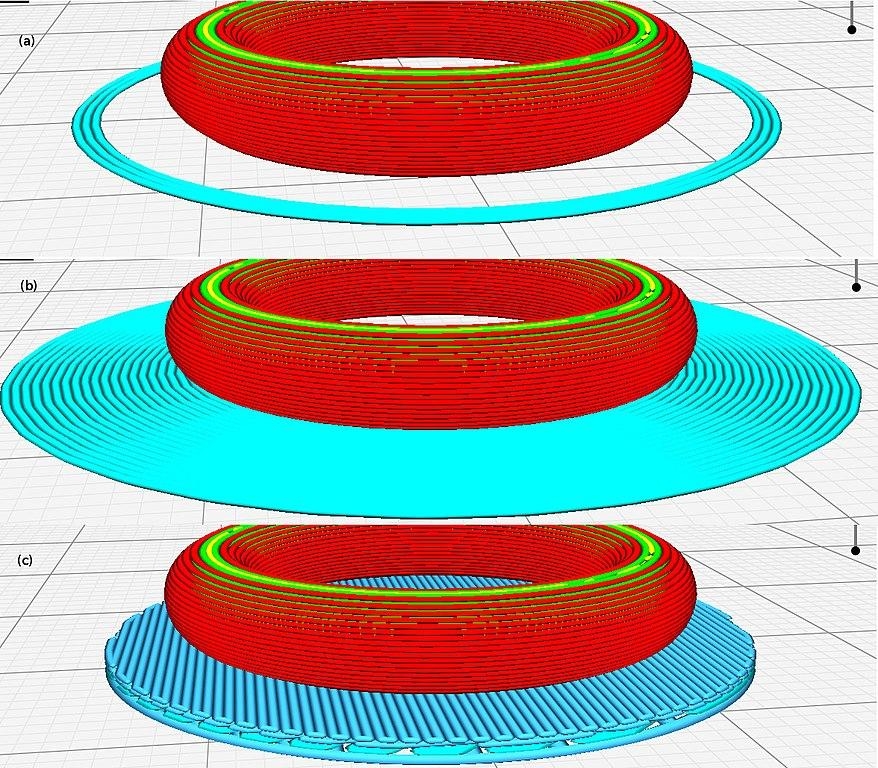
Brim
A brim is a wider outline that is printed around the base of an object. It is thicker than a skirt and has more layers. A brim is better for larger objects because it creates more adhesion and prevents warping due to uneven cooling.
So which one should you use? In general, a skirt is best for small objects, while a brim is better for larger ones. If you’re printing an object that’s less than 4 cm in height , a skirt should be enough. But if your object is larger than that, a brim is a better choice.
Ultimately, it’s important to experiment and find the settings that work best for your 3D printer and filament. With the right combination of settings, you can achieve great results with either a skirt or a brim.
It’s also important to consider the type of filament you’re using. Different materials require different settings for optimal results. For example, PLA is more prone to warping and may need a brim for larger prints. On the other hand, ABS is less likely to warp and can be printed using a skirt for most sizes.
When it comes to bed adhesion, both skirts and brims can be effective. However, brims may be better for larger prints because they create more adhesion and provide better protection against warping. Ultimately, the best choice will depend on the size of your object and the type of filament you’re using.
The key to successful 3D printing is understanding the different settings and options available in your 3D printer. Once you know which ones work best for a particular project, you can achieve exceptional results. This includes the choice of skirt or brim.
When it comes to adhesion and warping prevention, both skirts and brims can be effective. However, each has its own advantages and disadvantages, so it’s important to consider the size and type of filament when making a decision. In general, skirts are suitable for small objects while brims are better for larger ones. With the right settings and careful experimentation, you can get excellent results with either option.
When you Should use Rafts?
Rafts are another option for 3D printing, but they are not as commonly used as skirts or brims. A raft is a base layer that is printed on the bottom of an object. Unlike a skirt or brim, a raft extends beyond the edges of the object and helps to improve adhesion and reduce warping. Rafts can also help with layer adhesion since each layer is connected to the raft, rather than directly to the print bed.
However, rafts are not suitable for all objects and should only be used when necessary. Generally speaking, a raft should only be used if your object is large or complex in shape, or if you are printing with materials that require extra adhesion.
When you Should use Brims
Brims are best for large objects that require extra adhesion to the build plate. Brims can also help prevent warping caused by uneven cooling of the layers, since there are more layers in contact with the build plate. In addition, brims can help reduce stringing and other artifacts in your print.
When it comes to 3D printing, the choice of skirt or brim can be an important factor for achieving optimal results. Skirts are typically best for small objects, while brims are more suitable for larger prints. However, there may be other factors that can affect your decision as well.
One such factor is the type of filament you’re using. Different materials require different settings for optimal results, and some materials may need a brim for larger objects. Ultimately, the best choice will depend on the size of your object and the type of filament you’re using. With the right combination of settings, you can achieve great results with either a skirt or a brim.
Best Settings for Brim in Cura
When setting up a print in Cura, there are several factors to consider. One of these is the brim settings. Brims can be used to improve adhesion and reduce warping in certain types of prints. The following steps will guide you through setting up a brim for your print:
1. In the “Print Settings” tab, make sure the “Enable Brim” option is enabled.
2. In the “Brim” section, select the number of brim layers you would like to include in your print. Typically 3-4 layers are sufficient for most prints.
3. In the “Altitude” section, enter the height of your brim in millimeters. This is usually 0.5mm or 1mm for standard brims, but you can experiment to find the best setting for your project.
4. Finally, click “Save” to save your settings and start printing.
Best Settings for Raft in Cura
In some cases, a raft may be necessary to improve adhesion and reduce warping. The following steps will guide you through setting up a raft for your print in Cura:
1. In the “Print Settings” tab, make sure the “Enable Raft” option is enabled.
2. In the “Raft” section, select the number of raft layers you would like to include in your print. Typically 4-6 layers are sufficient for most prints.
3. In the “Altitude” section, enter the height of your raft in millimeters. This is usually 0.5mm or 1mm for standard rafts, but you can experiment to find the best setting for your project.
4. Finally, click “Save” to save your settings and start printing.
Overall, skirts are typically better for small objects while brims and rafts are better for larger prints. When setting up a print in Cura, consider the size of the object, type of filament and settings for both the brim and raft to get the best results.