7 ways how to fix z seam in 3d prints
Have you ever wondered what those little bumps on your clothing are? Those bumps are called Z seams and they play a crucial role in the construction of your garments.
Z seams are a type of seam that is commonly used in clothing construction. They are often found in the underarm area of shirts and can also be used in other areas of a garment.
Understanding Z seams is essential for anyone interested in clothing construction or who wants to learn more about the clothes they wear. In this article, we will take a closer look at what Z seams are, why they are important, and how they are used in clothing construction. So, if you want to take your knowledge of fashion to the next level, keep reading to learn all about Z seams.
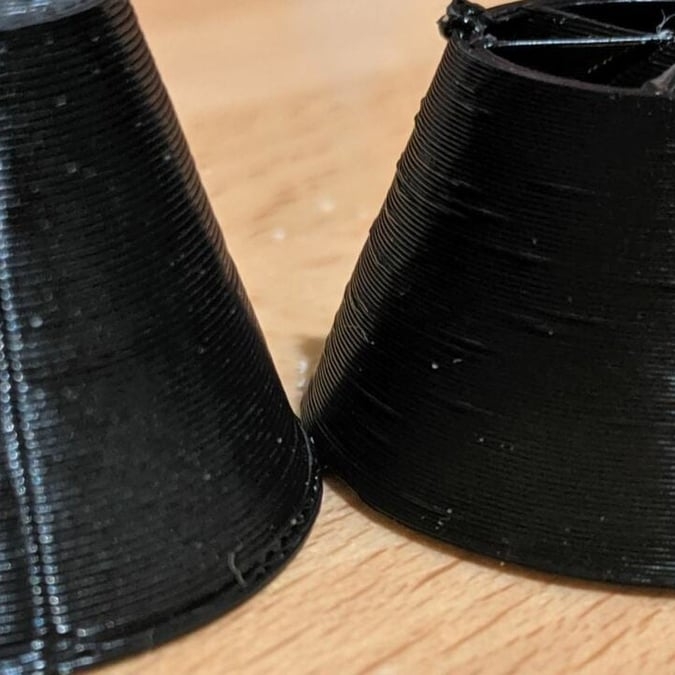
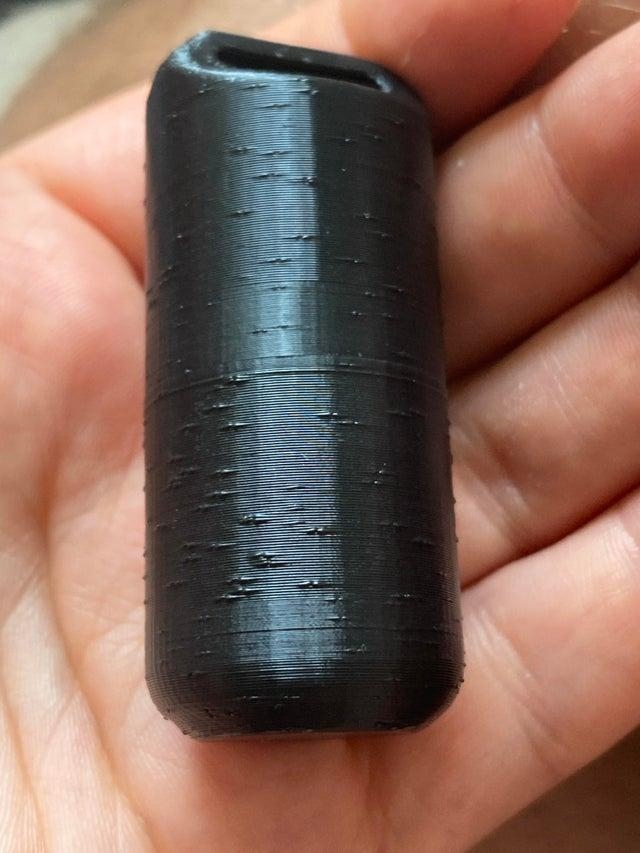
Have you ever noticed a seam in your 3D prints that ruins the smooth surface of your project? This is called the Z seam, and it can be frustrating to deal with. But don’t worry, there are ways to fix it.
3D printing has revolutionized the world of manufacturing and has made it easier to create complex designs. However, it’s not always perfect, and even the best 3D printers can have issues. One common issue is the Z seam, which is a line that appears on the surface of a 3D print where the printer starts and stops printing on each layer.
The Z seam can be a frustrating issue, especially when it ruins the aesthetic of your project. Fortunately, there are ways to fix it. In this article, we will explore 7 different methods to eliminate the Z seam and achieve a flawless finish on your 3D prints. So, let’s dive in and learn how to fix the Z seam in 3D prints.
7 Ways How to Fix Z Seam in 3D Prints
1. Increase the Print Speed: Increasing the speed at which the 3D printer prints can help minimize the visibility of the Z seam.
2. Reduce Infill Percentage: Lowering the infill percentage on your 3D prints can also reduce the appearance of a Z seam, as less material is needed to fill in each layer.
3. Use Support Structures: Adding support structures to your 3D prints can help reduce the visibility of the Z seam.
4. Change Nozzle Temperature: Changing the nozzle temperature of your 3D printer can also help minimize the appearance of a Z seam, depending on the type and quality of material you are using.
5. Use a Brim or Raft: A brim or a raft will provide additional surface area for the filament to adhere to, which can help reduce the visibility of a Z seam.
6. Use a Different Extruder: If you’re having trouble with the Z seam, switching to a different extruder might solve the problem.
7. Tweak Your Slicer Settings: Changing settings in your slicer software can also help reduce the appearance of a Z seam on your 3D prints.
These are seven methods you can use to reduce the visibility of a Z seam in your 3D prints. With some experimentation and tweaking, you should be able to find the best solution for eliminating those pesky bumps on your projects. Good luck!
What is Z seam 3D printing?
Z seam 3D printing is a type of 3D printing that creates objects with seams running along the Z-axis. This technique is used to create objects with complex geometries, as it allows for more control over the shape and size of the object being printed.
The main benefit of using this method is that it produces a stronger and more durable object than traditional methods. Additionally, Z seam 3D printing is often faster than other methods due to its ability to print multiple layers at once.
One way to reduce the visibility of a Z seam is by using support structures. Support structures are additional pieces that are added to the 3D print that help hold up areas with steep angles or overhangs. By adding support, the printer will be able to fill in those hard-to-reach areas without creating a visible seam.
Another method for reducing the appearance of a Z seam is by changing the nozzle temperature. Different types of filament and materials react differently to different temperatures, so it’s best to experiment with different settings until you get the desired result.
Finally, adjusting your slicer settings can also help reduce the visibility of a Z seam. Slice settings such as layer height, print speed, and infill percentage can all be adjusted to produce a better finish on your 3D prints.
How do I fix the Z axis on my 3D printer?
The Z axis is an important component of any 3D printer, as it allows the printer to move along the vertical plane. If your 3D printer is having trouble with its Z axis, there are several steps you can take to fix the issue.
First, check that all of the wiring and mechanical components are correctly secured and functioning properly. It’s also a good idea to make sure that the Z-axis is properly calibrated and that the nozzle is at the correct height.
If all of the components are working correctly, then it’s likely that your slicer settings are causing the issue. Make sure to adjust your slicer settings such as layer height and print speed to ensure that your 3D printer is functioning properly. Additionally, you may want to try changing the type of filament you are using, as some materials may require different settings in order to produce a smoother finish.
How do you get rid of Z seam 3D print?
To get rid of a Z seam on your 3D print, there are several methods you can try. First, you can adjust your slicer settings to reduce the visibility of the seam. This includes changing the layer height and infill percentage as well as adjusting other settings such as printing speed and temperature.
It’s important to experiment with different settings until you find the best solution for your project. You can also try using support structures, which are pieces that are added to the 3D print to hold up areas with steep angles or overhangs. This will help prevent the printer from creating a visible seam as it fills in those hard-to-reach areas.
Finally, you can try changing the nozzle temperature of your 3D printer. Different types of materials react differently to different temperatures, so it’s best to experiment with different settings until you get the desired result.
One effective way to reduce the visibility of a Z seam is to use a brim or skirt. A brim or skirt is an extra layer that is printed around the perimeter of the object and can help hide any imperfections in your 3D print. Additionally, this technique can also help with adhesion issues and ensure that all of your 3D prints start off level on the build plate.
One way to enhance the quality of a 3D print with a Z seam is by using a brim or skirt. This adds an extra layer around the perimeter of the object, which helps to hide any imperfections and ensures that everything starts off level on the build plate. Additionally, it can also help with adhesion issues, as it will allow the filament to stick better to the surface of the build plate.