3d printing layer height how much does it matter (1)
When it comes to 3D printing, there are several factors that can affect the quality of your prints. One of the most important factors is the layer height. But just how much does it matter?
3D printing has revolutionized the way we create and design objects. With the ability to print everything from toys to prosthetic limbs, 3D printing has become an essential tool in various industries. However, achieving high-quality prints requires a deep understanding of the various factors that affect the printing process.
Layer height is one such factor that can significantly impact the quality of your prints. But how much does it really matter? In this article, we will explore the importance of layer height in 3D printing and how it can affect the final outcome of your prints. We will also provide tips for optimizing your layer height to achieve the best results possible.
Layer height plays a crucial role in determining the quality and precision of a 3D printed object. But with so many options available, it can be difficult to determine which height is best for your specific needs. In this article, we’ll explore the importance of layer height and how it can impact your 3D printing results. We’ll also provide some tips and tricks for choosing the right layer height for your project.
3D Printing Layer Height: How Much Does It Matter?
Layer height is a crucial factor to consider when 3D printing an object. It affects the resolution of your printed object, as well as its strength and durability.
The layer height you choose depends on the size of the object, the quality required, and the type of plastic being used. If you use too low a layer height, the print will be more detailed but may lack strength or stability . Remember, the thinner the layer height, the longer your print will take to complete.
Optimizing Print Speed
When it comes to 3D printing, layer height and resolution are important, but so is print speed. The faster you can print an object, the more efficient and cost-effective your printing process will be. There are a few things you can do to optimize your print speed while maintaining quality:
1. Choose a suitable layer height – As mentioned before, the thinner the layer height , the longer it will take to print. Choose a layer height that is appropriate for your object size and plastic type.
2. Increase nozzle temperature – Increasing the temperature of the nozzle can help it melt plastic faster and reduce print time. However, be careful not to exceed the recommended temperature for your material, as this can cause warping or other issues.
3. Use an adequate infill percentage – Infill is the amount of plastic used to fill the inside of a 3D printed object. Increasing the infill percentage will reduce printing time without compromising quality.
Raising the Resolution
If you want to achieve higher resolution without necessarily increasing the layer height, there are a few other options available.
You can use a higher printing temperature, which will help the plastic to adhere more closely to the print bed and create finer details. Additionally, consider using a smaller nozzle diameter for more detailed prints. The smaller diameter allows for a thinner layer of plastic and therefore, smoother details on your object.
Smoothing the Surface
In some cases, you may want to reduce the visibility of layer lines in your 3D printed object. This can be achieved by post-processing the object with a smoothing technique.
One possible method involves sanding the surface of the object to remove any excess plastic or ridges caused by layers. You can also use acetone vapor smoothing or polishing compounds to smooth out the plastic.
Other Settings
There are other settings in your 3D printing software that can also affect the outcome of your prints. For example, you can adjust the infill percentage, speed and temperature of the plastic. Paying attention to these settings will help you create higher-quality prints with less time and effort.
Initial Layer Height
The initial layer height is the first layer that is printed after the bed has been leveled. It is important to choose an appropriate initial layer height, as this will determine how well the object adheres to the print bed and therefore affect its overall quality. For most 3D printing materials, a 0.2mm layer height works best for most objects.
Adaptive Layer Height
Adaptive layer height is a feature in 3D printing software that allows you to vary the layer height depending on the curvature of the object. This can help reduce print time and improve quality, as it allows for finer details in areas where precision is important.
Why does 3D printing layer height matter?
Layer height is an important factor to consider when 3D printing an object because it affects the resolution, strength, and durability of the printed item. The layer height you choose depends on the size of the object, the quality required, and the type of plastic used.
If a layer height is too low, it can result in a detailed print with decreased strength or stability. On the other hand , if the layer height is too high, then the printed object may not have enough detail or may not be as strong. Ultimately, choosing an appropriate layer height is important for achieving a successful 3D print.
Key considerations for 3D printer layer height
• Object size: The layer height should be appropriate for the size of the object being printed.
• Plastic type: Different plastics require different layer heights for optimal results.
• Resolution: A lower layer height will result in a higher resolution and more detailed prints.
• Strength: Increasing the layer height can reduce the strength of an object, so it is important to find a balance between resolution and strength.
• Post-processing: If you want to reduce the visibility of layer lines, you may need to sand or use a polishing compound after printing.
Print Speed and Quality
Print speed and quality are two important factors to consider when it comes to 3D printing. The faster the printer runs, the more quickly an object can be produced but at a cost of resolution. For high-resolution prints, a slower printer may be necessary in order to achieve better results. Additionally, for higher-detail prints, a lower layer height may also be necessary.
By understanding the key considerations of layer height, you can better adjust the settings on your 3D printer to get the best quality prints. With a little experimentation and practice, you will soon be able to create impressive 3D prints with minimal effort.
How do you know the right layer height for your 3D printing application?
It is important to research the material you are intending to print with and what type of object you are printing. The manufacturer will almost always provide a recommended layer height for their printer and materials, which can be a good starting point. It is also beneficial to experiment with different layer heights and speeds in order to find the best combination of quality and efficiency for your application.
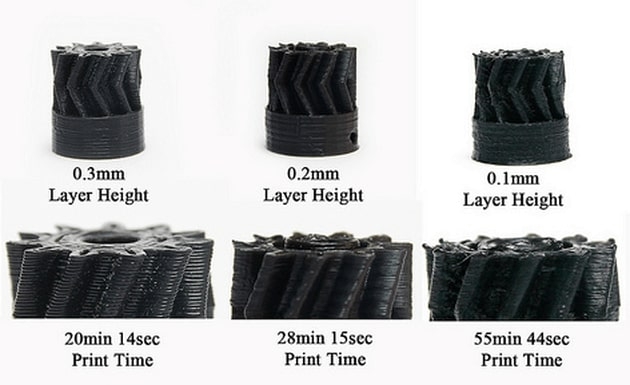
When trying out different layer heights, it is important to remember that a lower layer height will produce higher resolution and detail, but will likely take more time to print. Conversely, a higher layer height may be quicker to print, but you may sacrifice some detail and resolution in the process.